As a second year Photography student here at the University of Salford, and with photography becoming so popular in our everyday lives, I have put together this blog to give you some top tips and hints of how to improve your skills!
1. Composition
There are two simple ways to improve your composition to create the perfect image. These are the Fibonacci Spiral (also known as the Golden Spiral) Rule, and the Phi Grid (Rule of Thirds). Both of these techniques use a grid to separate your image into sections, and if you can master how to use these your images will definitely appear more aesthetically balanced – and it’s all down to science!
Fibonacci Spiral
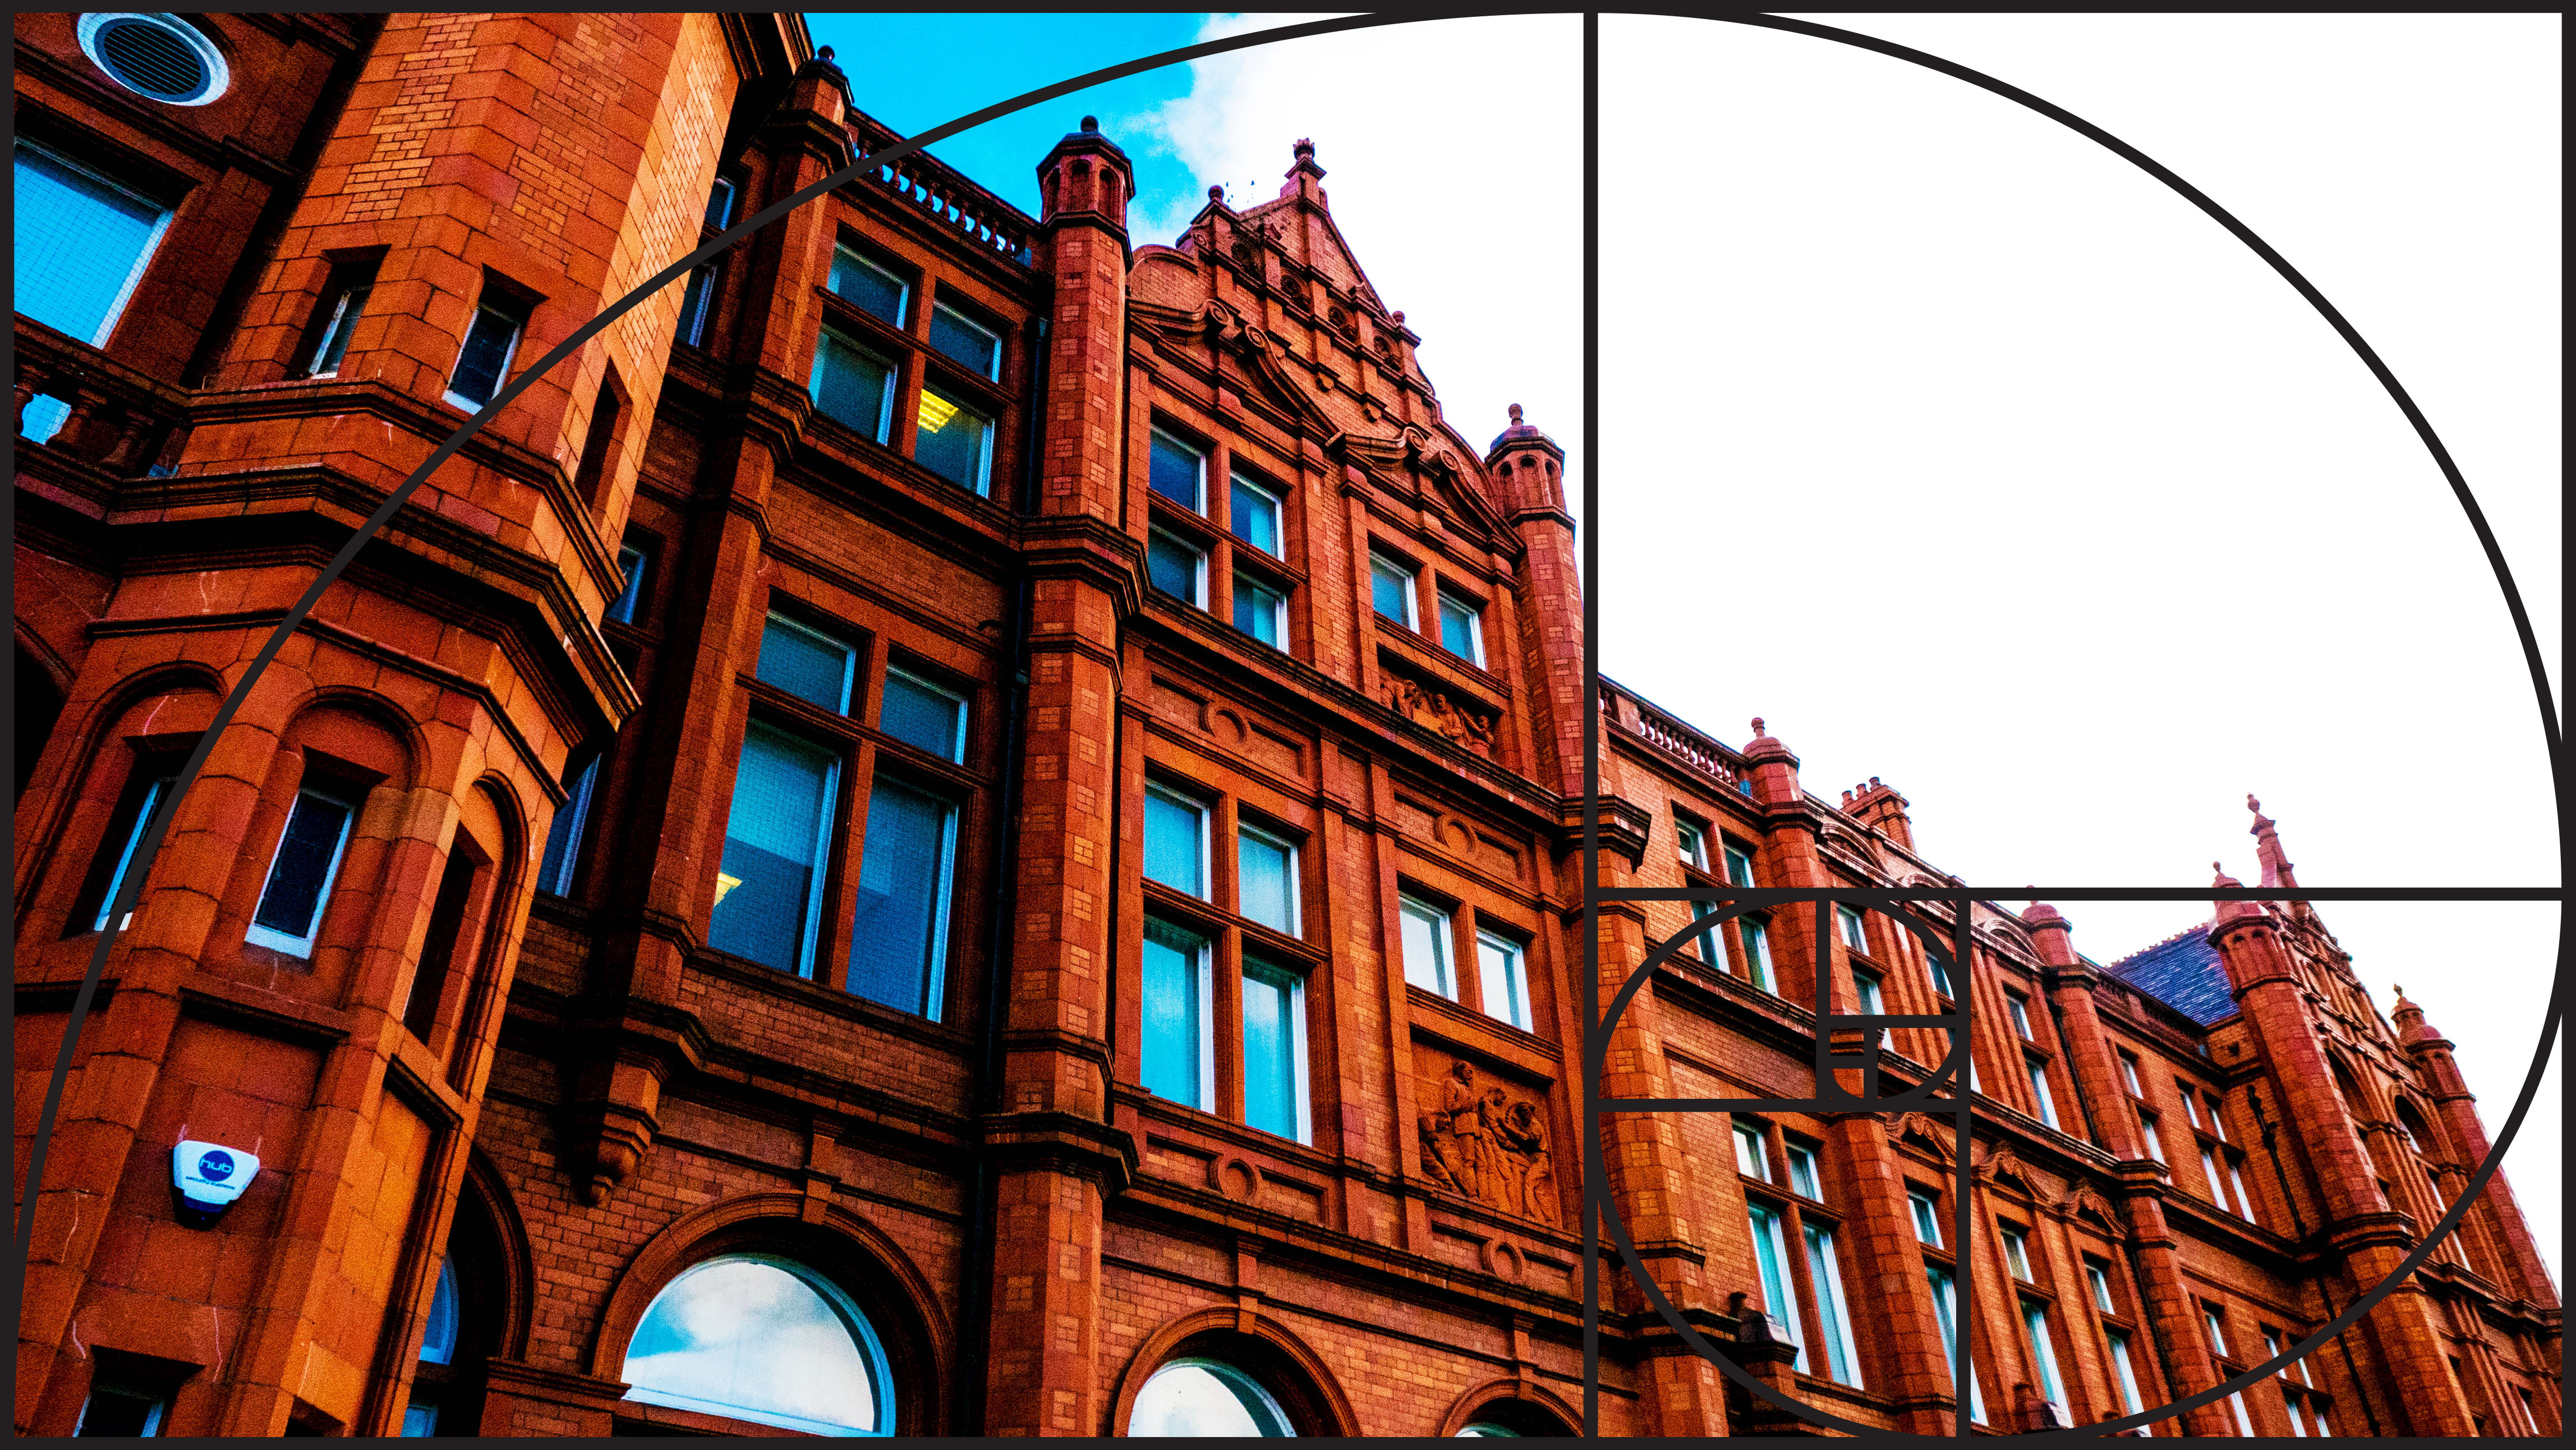
Here is an image I took of the University’s majestic Peel Building. As you can see, the spiral provides a template which sections your image. The Fibonacci sequence is used to make the template, and for those who are familiar with ‘The Da Vinci Code’ you’ll be aware that the sequence appears in many forms of nature which means it is scientifically pleasing to the human eye.
When using the Fibonacci Spiral it is important to frame key focal points within the sections of the spiral, images that use this tend to contain a lot of focal points within one corner. It’s about keeping some sections quite busy when others have lots of blank space – balance is key! Here for example there is a lot of detail and content towards the left of the image and bottom right corner, yet the top right section contains little to no content at all.
Phi Grid
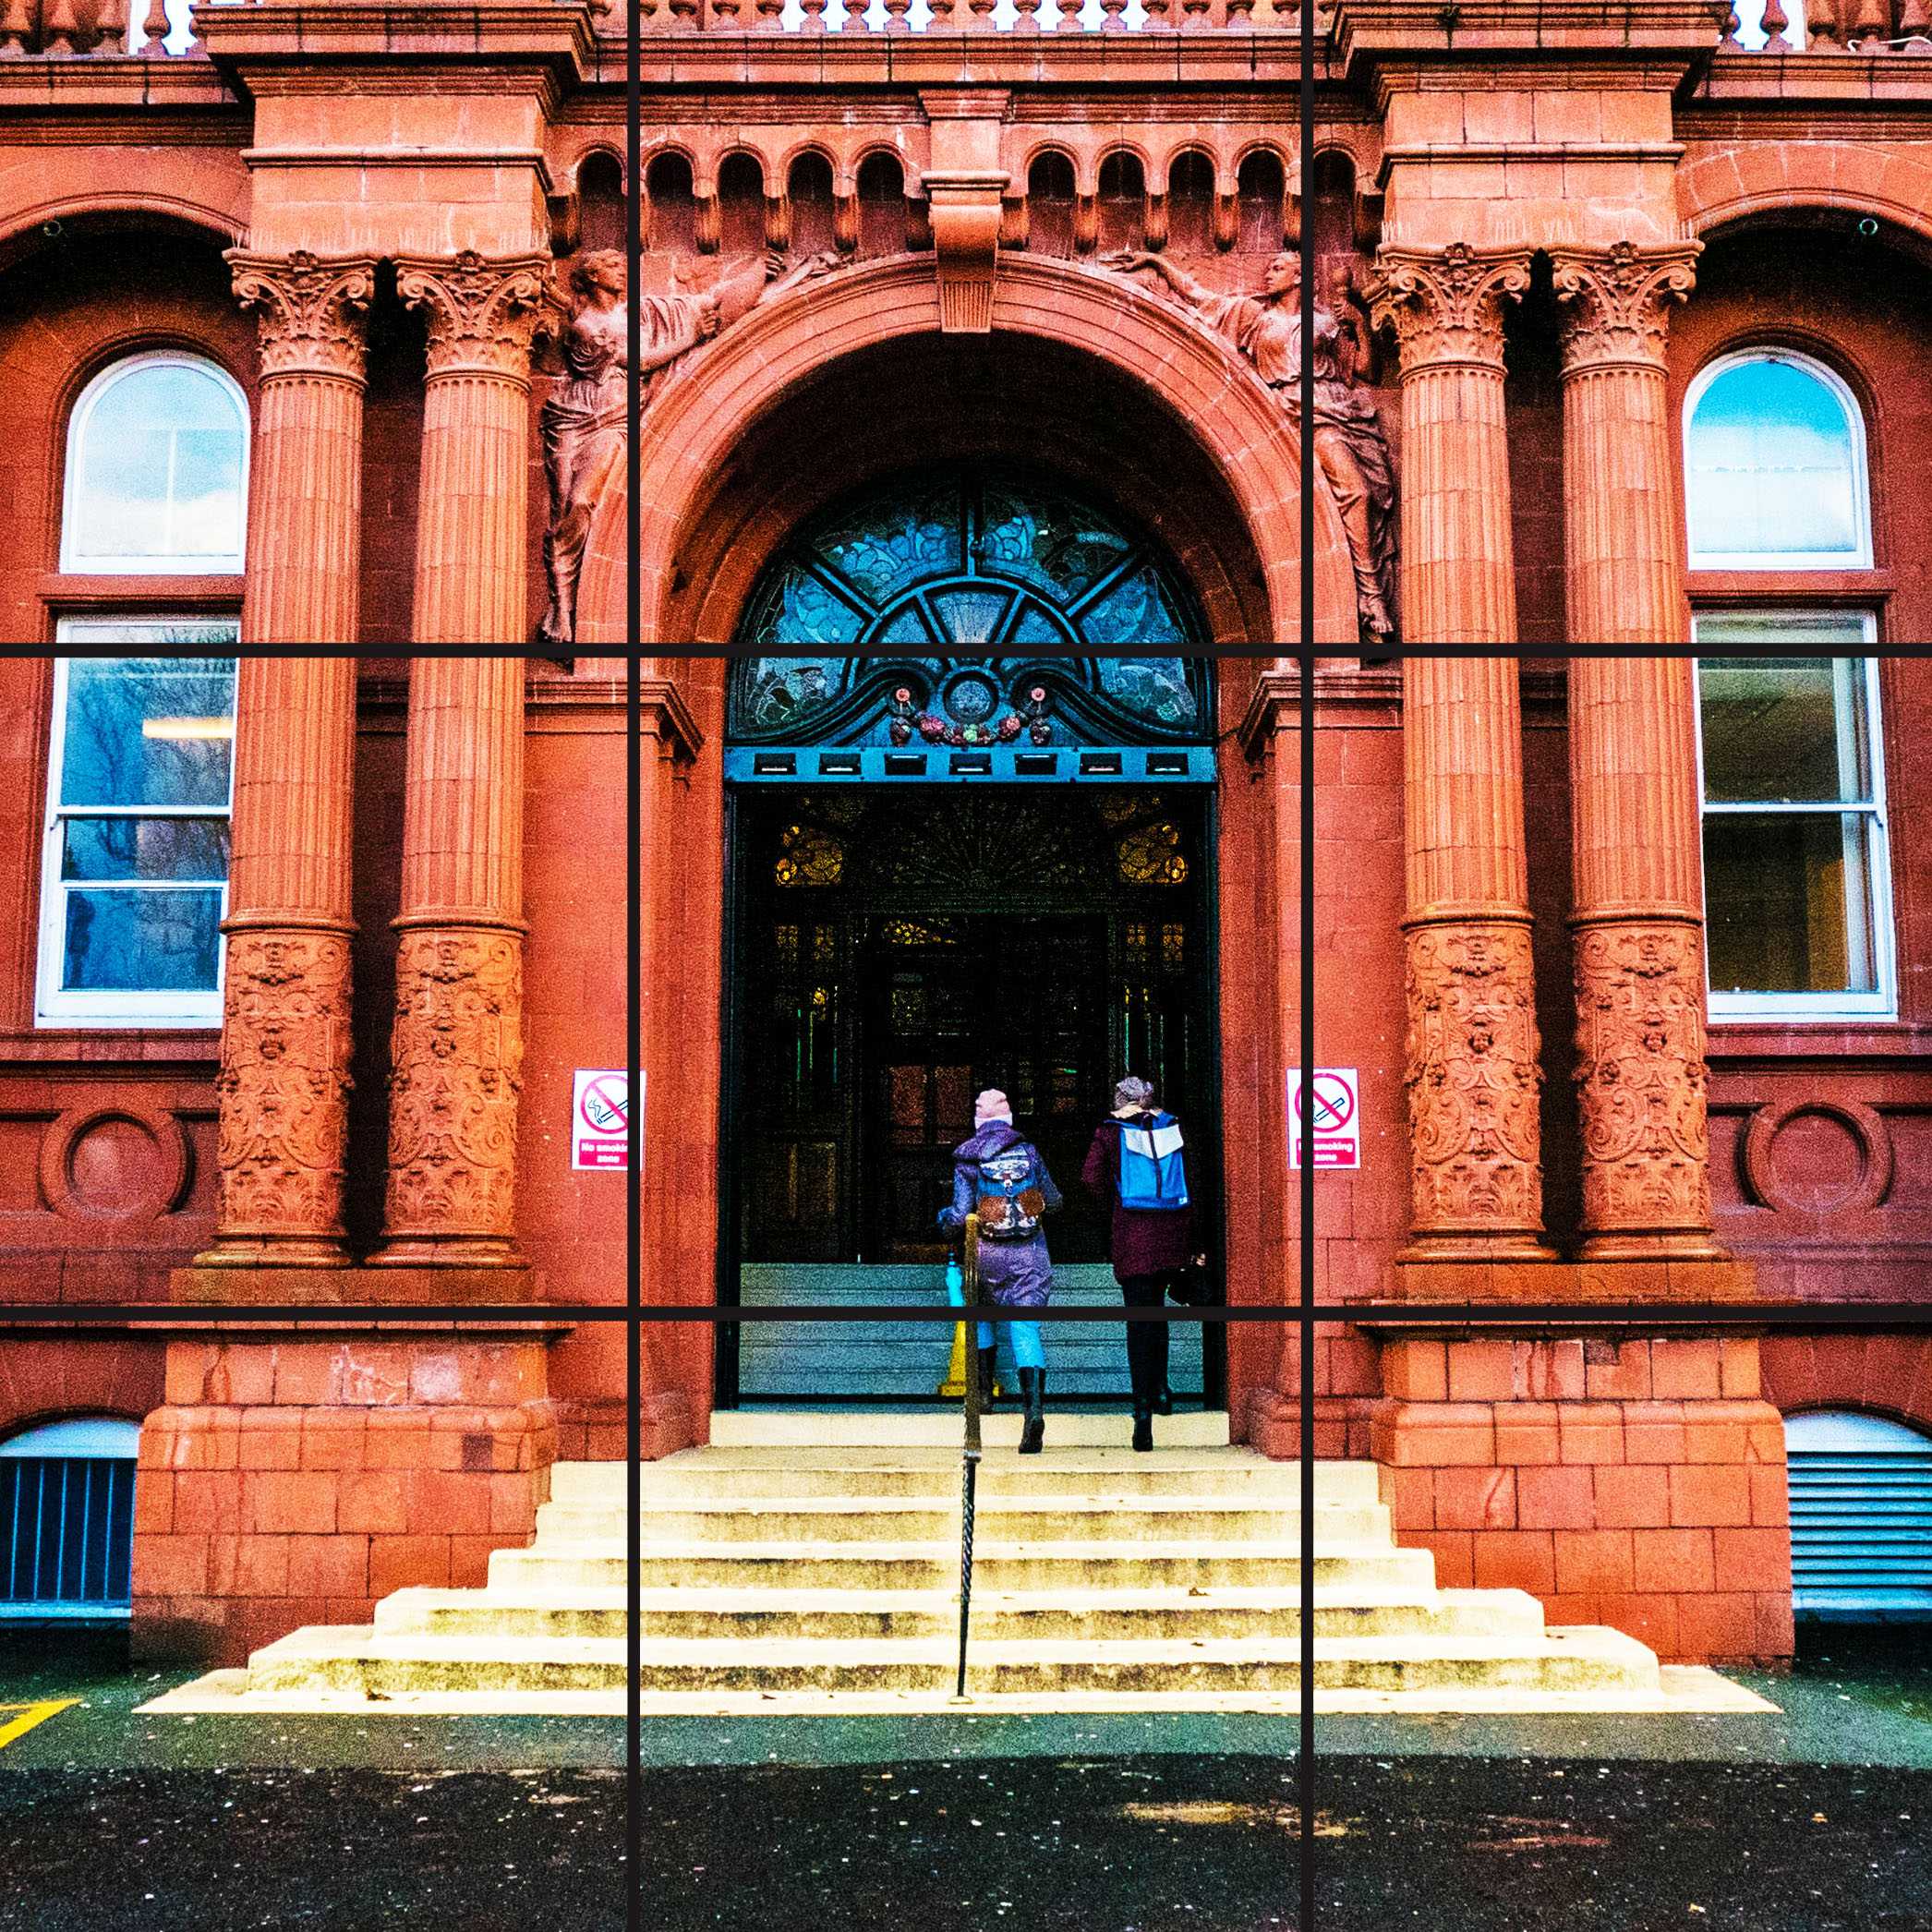
Ever wondered what that grid is that appears on Instagram? The Phi Grid uses simple balance to compose an image. Splitting the image into nine equal squares also splits the image into columns, this is usually something a photographer would concentrate on. Keeping focal points within the lines and equal distance apart is important. Here the main focus is on the middle vertical column, the rest of the image is then kept equal in both neighbouring columns.
2. Backgrounds
Commercial photography is used throughout everything as everyone wants to look their best online. A small tip which I use quite often is when I am photographing a product, I will use some form of fabric or consistent background behind. Commercial photographers would use a light box for this, but we’re on a budget – grab your duvet cover and use flash. Place the product onto the background fabric and make sure the pattern or colour is consistent all the way to the edge of the frame.


I must use my leopard print bedding for most of my Insta pics, obsessed!
3. Angles
Don’t be afraid to take 100 photos of the same thing at all different angles. One thing I have learnt since studying photography is that you can never photograph something too much. Photographs which you may not like in the first instance – you look back on a week later and think “actually that’s a pretty decent angle, I can edit that and re-upload!”

4. Editing
The power is in the edit. As long as they are in focus, even your least favourite shots can usually be saved through editing if all else fails. Try manually editing your Instagram posts every once in a while instead of using filters. Take an awful photo and use editing to see actually how much better you can make the image. After all, Kim Kardashian doesn’t have permanently flawless skin, she has the best editors and software!


Edited vs unedited. For this image I adjusted only the brightness, contrast and saturation slightly, and look at the difference!
5. Equipment
Throughout my study I have only ever owned one camera which I bought around four years ago. I haven’t thought about upgrading – because technology improves so quickly these days. We are all lucky enough to have one of the most valuable photographic devices – smartphones. The iPhone is especially good for images, in some cases even better than some DSLRs. Here at the University of Salford, as part of my course we have access to the university store and can rent out all types of equipment for free. This is what I do when I need a high quality camera for a project.
6. ‘Candid’
The term ‘candid’ has almost lost its meaning recently with ‘candid’ images being planned, which defeats the point! However it is so important when photographing people. If you’re trying to capture a person, whether they are modelling or you’re taking street documentary images, people are always nervous when having their photograph taken. One way to beat this, is set up your camera on a tripod to start with, then talk to the person about their day as if you’re having a normal conversation. This makes them less nervous, allowing you to photograph them when they don’t even know it’s happening. This way you can get beautiful candid images and a happy model!

7. Experiment
This is a MUST! If you’re a photographer that works with film, get your film cross-processed once, go on, risk it! This is where the film is developed using the wrong solution for the film type, creating unknown effects and colour change. Exciting! You can also scan in your film and edit it with various effects on Photoshop, try new things and you’ll be surprised. Just make sure you save the original! If you’re using a smartphone camera, there are loads of apps around that help to create various effects on your photographs. Download some and start experimenting!

Extreme experimentation here, but you can even change everyday photographs into fine art style pieces by editing in Photoshop.
And that’s it! My top 7 hacks for Insta worthy photos. Get yourself Instagramming!
Photography: India Booth